Animations are one of the most powerful visual elements you can add to your page. They add life to your designs, and they add beauty and a wow factor to your pages. They also have the ability to convey messages much more efficiently than text or static images.
In this article, I will be demonstrating how to quickly add high quality FREE animations to any website built with WordPress (and Elementor).
I am not going to cover how to make the animations, as this requires experience with Adobe After Effects, which I don’t have.
Instead we are going to use two resources that I found that offer totally free animations. The wonders of the modern marketplace, I still can’t get over how many free resources it products. It’s amazing how many talented designers and developers give up their time and their work to benefit the community. Anyways, that’s the end of my mini-rant.
The two sites are Lottie Files and icons8. They offer free animated illustrations and icons, respectively.
For an example of how beautiful the animation looks when inserted into a webpage, take a look at the homepage for tedia.consulting (and see if you can spot it on the Contact Page)
Spoiler (for the lazy)
You can sprinkle these little items into your designs and give it a spark that will make people pay more attention to the page.
So how is it done?
Step 1. The first thing you need to do is install the WP Bodymovin plugin from the wordpress plugin directory. From your WordPress Dashboard, just go to Plugins > Add New and search for WP Bodymovin, click install and activate.
Step 2. Once the plugin is installed and activated, you should see an option for Animations in your WordPress Dashboard. Now you’re ready to add animations!
Step 3. Find an animation you like, either by searching or browsing, and download the lottie/json animation file from Lottiefiles.com (Icons8 is a little more complicated, click here to jump to those instructions). You can also change certain things about the animation like the background color and speed, etc:
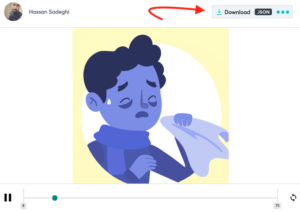
Step 4. You should now have a file saved to your downloads folder (or wherever you save your downloads). Make sure the filename ends with a .json, because this the only filetype that will work.
Step 5. From the WordPress Dashboard, click Animations > Add New (If you don’t see this menu, check steps 1 & 2)
Step 6. Add a Title to your animation, and then click choose file under the words JSON Data File. Click on the Publish Button, and wait for the image to upload. After the upload completes, you should see a preview of your animation.
Step 7. You can now change a few settings on how your animation will display, such as width, height, loop, and autoplay settings. But the main thing is the shortcode that is generated on the bottom of the page:
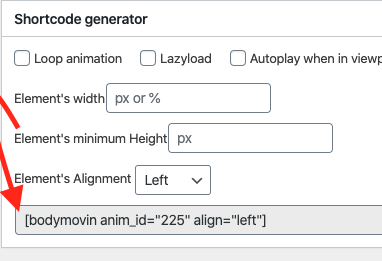
This is the code that you can paste basically anywhere on your wordpress site that will magically display this animation. Here it is now as a demonstration:
The shortcode is [-bodymovin anim_id=”225″ loop=”true” lazyload=”true” autoplay_viewport=”true” autostop_viewport=”true” width=”50%” align=”left”-] (without the dashes) and I just pasted it into the wordpress editor:
Step 8 (For Elementor). Now for Elementor page builder we need one more step. We need add a text input element to the area that we want to add out animation to, and the just paste the shortcode in. You won’t get an instant preview when you paste a shortcode, but you can hit preview page to see the preview.
Icons8 Instructions: In order to get animations from icons8, go to https://icons8.com/animated-icons and download the whole pack, then find the icon you want with the file ending in .json and upload like above. If you want one icon individually, you have to copy the url, copy the text that the browser displays into a text editor, then save with the .json at the end. Then you can repeat as above.
And that’s about it for the basic instructions! Very Easy, as you can see.
I hope this article was helpful to you if you were looking for info on adding an animation to your wordpress site. I also want to give credit to the youtube video that I discovered this on- Here is a link
If you like this article and want to stay up to date on other tips, tricks, and ideas that I discover – Sign Up Here
If you are interested in creating a site for you brand, or improving on your existing site, please feel free to contact us using the contact form below.